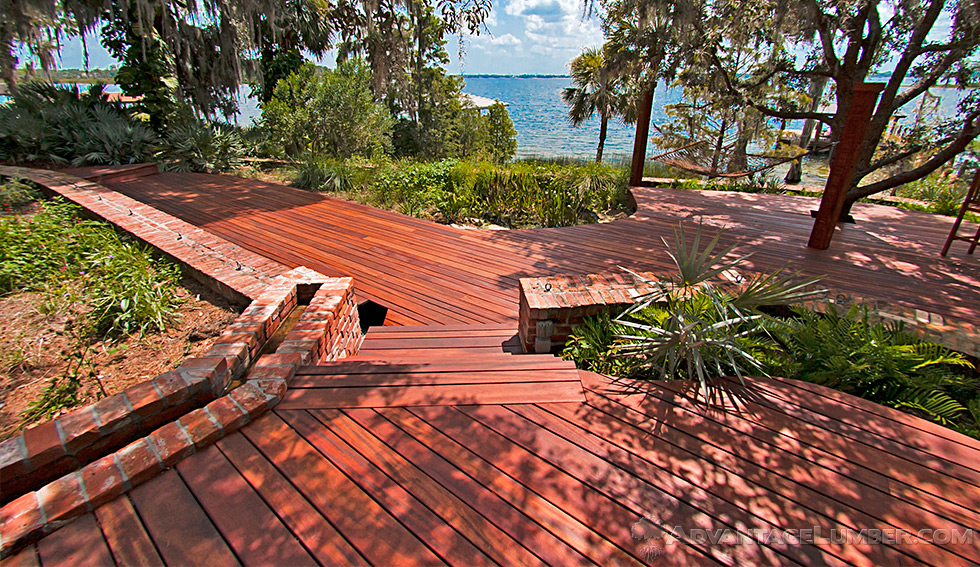
Tigerwood Deck Installation
Follow These Instructions for Perfect Results
Tigerwood is a very dense, very hard wood. Use of some specialized or higher grade tools may be necessary for good results. This page will give you an overview of handling and building suggestions that will help you achieve excellent results when building your Tigerwood deck. Click here to see our Tigerwood decking price list.
Before You Start
Always check with an architect and local building codes prior to starting your project. Follow all codes that apply to your area. Follow all manufacturers’ instructions for the individual products used in the project. If the manufacturers’ instructions contradict your local building codes or differ from information provided by AdvantageLumber.com, contact us for written clarification prior to starting your project.
Since decking projects involve many different variables, it’s your responsibility to test the material’s suitability for your project prior to construction.
What Type of Decking to Use?
Air-Dried vs. Kiln-Dried
Wood may be dried for exterior (air-dried or kiln-dried for exterior) or interior (kiln-dried for interior) use. Lumber dried for exterior use must not be used indoors, as it will shrink and check. Likewise, lumber dried for interior use must not be used outdoors, as it will expand, cup, and buckle. All of our Tigerwood decking is dried for exterior use.
Standard and Pre-Grooved Decking
This is what you want for outdoor decking applications. Standard decking is cheaper and easier to install, but pre-grooved decking will look nicer when finished because it hides the screws between boards.
Tongue & Groove Porch Decking
This is for use in covered areas, and will look similar to hardwood flooring when finished. T&G decking has no gap between boards, so moisture gets trapped on the surface. If you install T&G decking in an uncovered area exposed to rain, the boards will cup, swell, and buckle.
Storage and Acclimation
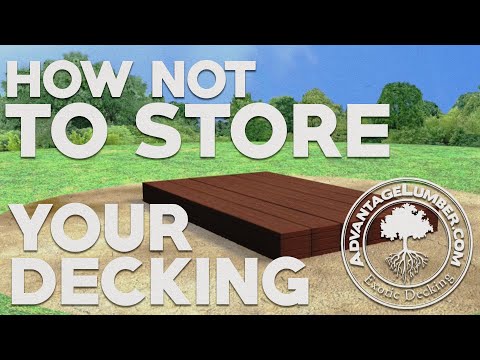

Tigerwood decking should be allowed to sit where it will be installed for at least 7 days prior to installation. This lets the wood acclimate to your local temperature and humidity levels.
Things to Avoid
Below is a list of common mistakes when acclimating your decking. These mistakes prevent the wood from adjusting properly and will cause problems after installation.
- DO NOT store decking directly on the ground or over a concrete surface
- DO NOT store decking for more than 30 days without first consulting an AdvantageLumber.com sales rep
- DO NOT cover decking with a tarp or plastic sheet
- DO NOT store decking in a garage or other enclosed area

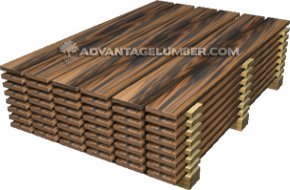
Proper Acclimation
To give your Tigerwood decking project the best chance at success, here’s a list of things to remember.
- DO elevate decking at least 12″ off the ground using blocks of wood
- DO separate layers of stacked decking with wood shims
- DO cover decking with a sheet of plywood to shed water
- DO ensure every face of every board receives adequate air flow
Framing and Span Requirements
Do not build your Tigerwood deck over a new or aged concrete slab. Concrete causes moisture retention problems, which will lead to cupped or crowned deck boards.
Framing material should be installed with the crown up (humps up) to aid in water drainage. Framing lumber can crown ⅛″ or more, and if you install it humps-down, it can lead to standing water and warped boards.
Your joist spacing depends on the thickness of the deck boards. Refer to the following chart for your span requirements.
| Decking Size | Maximum Joist Spacing |
|---|---|
| 1x4 | 16″ |
| 1x6 | 16″ |
| 5/4x4 | 24″ |
| 5/4x6 | 24″ |
| 2x4 | 32″ |
| 2x6 | 32″ |
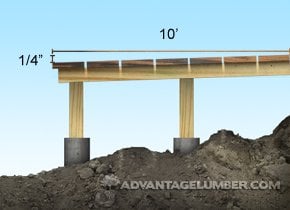
Deck Pitch
When designing your deck, make sure it slopes away from the house to allow for water runoff. We recommend a minimum pitch of ¼″ per 10 feet for standard and pre-grooved decking. For T&G decking, a more aggressive slope of ¼″ per foot is highly recommended.
Gap Spacing
Standard and pre-grooved Tigerwood decking must be installed with a gap of ¼″ between boards to allow for expansion, air flow, and water drainage.
Allowable Shrinkage
When installing standard and pre-grooved decking, install each board with the minimum allowable gap spacing noted above in case shrinkage occurs. Tongue & groove boards should be installed as tightly as possible without any gap spacing. Average shrinkage is approximately 1/8″ on 4″ wide boards and 1/4″ on 6″ wide boards. Shrinkage may vary depending on climate, installation site, and method of use.
Ventilation
The deck design should allow for ventilation underneath the deck. This prevents moisture from building up and warping the boards. We recommend at least 18″ of open air under the joists, and the sides of the deck should be left open. If you install skirting around the deck, it is imperative that the skirting does not prevent good air flow.
The ground under the deck should slope away from the house. This allows for water runoff and directs air flow up through the gaps between boards. The deck should not be installed over a concrete pad.

Cutting and Drilling
Tools
Tigerwood is very dense. Standard tools will have trouble or even fail to cut and drill this wood. For cutting, we recommend premium carbide-tipped saw blades. For drilling, use brad-point drill bits or fostner bits to predrill screw holes.
End Sealing
All cuts should be sealed immediately with a clear wax to prevent end checks and adverse movement. We sell end grain sealant by the quart, which is enough for 500 square feet of Tigerwood decking. Apply the sealant with a paint brush. Do not apply end seal to the surface of the decking. Any sealant that gets on the surface should be wiped up immediately.
Fastening
Use only stainless steel screws to fasten Tigerwood decking. Anything other than 305-grade or higher stainless steel will cause staining in the wood; in the worst cases, the screw will corrode and fail prematurely.
Predrilling is required for every screw. Failure to do so will cause the wood to split. This damage is permanent, and the board will come loose over time.
Standard Decking: Face Screw Method
Secure standard Tigerwood decking directly to the joist by screwing straight down through the face of the board. You can hide the screws by countersinking them and covering them with wood plugs. This method requires a ⅛″ pilot hole for the screw itself and a 3/8″ countersink for the plug, which is glued into place. The plug is then cut and sanded level with the rest of the board.

Pre-Grooved Decking: Hidden Fastener Method
Our pre-grooved Tigerwood decking profile is shaped to fit the Ipe Clip® hidden fastener system. The clip fits into the groove and is screwed into the board and joist at a 45° angle. The next board then slides into place over the other side of the clip. This method allows the boards to shrink and expand with changes in the air moisture content, prevents rot, and gives you a screw-free decking surface.

Tongue & Groove Porch Decking
T&G porch decking must be installed directly over floor joists, not a subfloor, to allow for ventilation. The porch must be under cover to protect it from moisture and be pitched to allow for drainage. Screw the board into the joist at a 45° angle at the base of the tongue with a stainless steel trim-head screw. The trim-head must sink into the groove at the base of the tongue to allow the next board to slide over top of it.

Finishing
Because of Tigerwood’s natural density and alkaline characteristics, many finishes will not dry properly when applied. Test any product on several sample boards to determine compatibility.
The finish we sell and recommend is Ipe Oil™. This finish is suitable for all exotic hardwood species and is specially formulated to overcome the challenges that Tigerwood presents.
We recommend applying a coat of oil after finishing the installation. This will give the wood some extra stability. After that, you may apply a fresh coat every year (depending on your local climate) to preserve or restore the Tigerwood’s original rich color. If you choose not to apply regular coats of oil, the wood will turn gray, but this is purely aesthetic; your deck will not become unstable if you choose not to oil it on a regular basis.
For low-ventilation applications, we recommend finishing deck boards on all four sides prior to installation but after acclimation.
Gluing
If you need to glue your Tigerwood decking, waterproof glues such as Gorilla brand polyurethane will work. Epoxy glues are also suitable and can be dyed to match your deck. Epoxy produces a very strong waterproof bond, particularly important for gluing posts.
Important Disclaimer
AdvantageLumber.com provides this information as suggestions only and will not be held liable should the material or instructions prove unsuitable for your project. AdvantageLumber.com is also not liable should you fail to obtain the required permits or comply with local zoning ordinances and building codes.
If you have any questions, please contact us prior to starting your project.