Phone Hours
Monday–Friday 8:30am–8pm EST
Saturday 8am–3pm EST
Sunday Closed
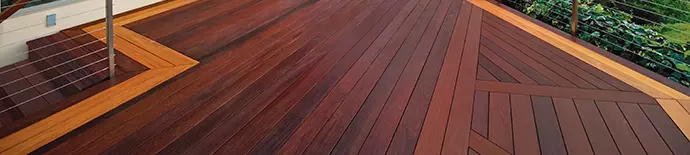
Whether you want a spot to display your firewood or a place to cover those unsightly trashcans, this is the DIY project for you! You can choose to build an open-sided service shed for an easy firewood shelter, or just add doors if you’re tired of looking at those gross, dirty trash cans every day. By building a service shed out of Advantage Ipe, you will have a beautiful structure you can be proud of for many years to come. Just follow this guide!
| Description | Quantity/Size Firewood Shed |
Quantity/Size Garbage Shed |
Material |
|---|---|---|---|
| Framing | |||
| Side & end floor supports | 2 @ 10' | 2 @ 10' | 2x4 Ipe |
| Center floor supports | 1 @ 8' | 1 @ 8' | 2x4 treated lumber |
| Floorboards | 3 @ 10' | 3 @ 10' | 1x6 Ipe |
| Corner posts | 4 @ 8' | 4 @ 8' | 2x4 Ipe |
| Headers | 2 @ 8' | 2 @ 8' | 2x4 Ipe |
| Rafters | 1 @ 8' 1 @ 4' |
1 @ 8' 1 @ 4' |
2x4 Ipe |
| Rear center post | 1 @ 4' | 2x4 Ipe | |
| Doorposts | 1 @ 8' | 2x4 Ipe | |
| Door ledger | 1 @ 8' | 2x4 Ipe | |
| Slats | |||
| End slats | 5 @ 8' | 5 @ 8' | 1x6 Ipe |
| Back slats | 5 @ 8' | 1x6 Ipe | |
| Roofing | |||
| Sheathing | 1 sheet @ 4x8' | 1 sheet @ 4x8' | ¾" CDX plywood |
| Roof edging | 2 @ 10' | 2 @ 10' | 1x2 T |
| 15 # building paper | 37 sq. ft. | 37 sq. ft. | |
| Shingles | 25 sq. ft. | s5 sq. ft. | 18" cedar shingles |
| Roof cap | 1 @ 8' 1 @ 8' |
1 @ 8' 1 @ 8' |
1x4 Ipe 1x3 Ipe |
| Shelf & Doors | |||
| Shelf | 1 @ 24 5/8x28 1/8" | ¾" ext.-grade plywood | |
| Shelf cleats | 1 @ 6' | 1x3 treated lumber | |
| Door panels | 3 @ 10' | 1x6 Ipe | |
| Stiles | 3 @ 8' (wide doors) 1 @ 10' (narrow door) |
1x4 Ipe | |
| Hinges | 6 | Exterior hinges | |
| Door handles | 3 | Exterior handles | |
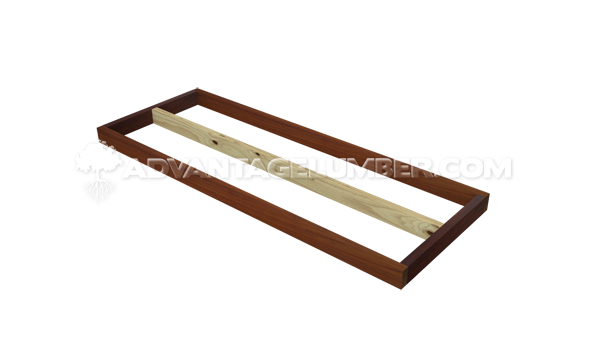
Construct the floor frame: Cut the side supports, end supports, and one center support. All pieces should be Ipe, except for the center support which can be treated lumber, since it won't be visible in the finished project. Fasten the end supports between the sides with 3 ½" deck screws; locate the screws where they won’t interfere with the corner post lag screws. Fasten the center support between the end supports, centered between the side supports.

Cut twelve 1x6 Ipe floorboards to length. Make sure the floor frame is square, then install the first board at one end, flush the outsides of the frame using 3" deck screws. Use 1" spacers to set the gaps as you install the remaining boards. Rip the last board as needed. (For the closed shed, create a 1 ½ x 2" notch for the left doorpost, starting 26" from the left end of the floor frame).
Build the corner posts out of Ipe: rip two 8-ft. 2x4s to 2" in width. Make an 18 degree cut about 53", leaving a 43" piece from each board. Cut two full-width 2x4 pieces at 53" and two at 43", beveling the top ends at 18 degrees. Assemble each front post to form an “L", using the 53" pieces and keeping the angled ends flush; use 2 ½" deck screws. Assemble the rear posts the same way using the 43" pieces.
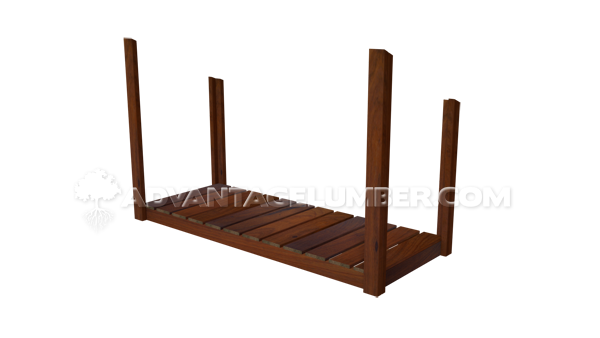
Trim the corner posts to length: First, cut the front posts at 49", measuring from the longest point of the angled ends. Cut the rear posts at 38 ¼", measuring from the shortest point of the angled ends. Mark the insides of the posts 1 ½" from the bottom ends. Set each post on the floor frame so the mark is aligned with the bottom of the frame, then anchor the post with two 3" lag screws and washers, driven through counter bored pilot holes.
To begin framing the roof, cut two 2x4 Ipe roof headers at 73”. Bevel the top edges of the headers at 18 degrees using a circular saw and cutting guide or a table saw. (The broad face of the header should still measure 3 ½".) Position the headers between the corner posts, flush with the outsides of the posts. Also, the beveled edges should be flush with the post tops. Fasten the headers to the posts with 2 ½" deck screws.
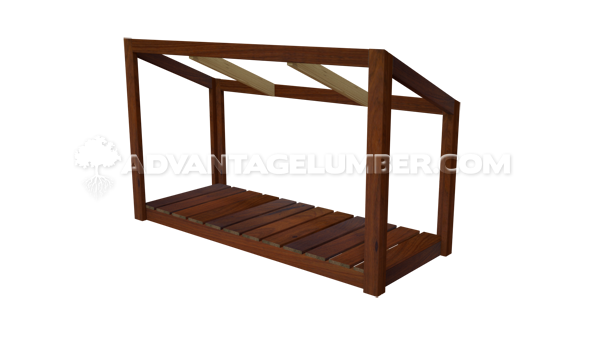
Cut two upper and two lower rafters. Install the end rafters, made of Ipe, between the corner posts, flush with the tops of the posts, using 2 ½" deck screws. Install the two center rafters, made of treated lumber, between the headers, 25" in from the end rafters. For the closed shed, cut the 2x4 rear center post to run the bottom of the rear header down to 1 ½ below the bottom of the floor frame. Install the center post centered between the corner posts.

Plan the layout of the 1x6 Ipe slats, gapping the them as desired. On each side, the bottom slat mounts to the outside of the floor, covering the floor from view. The remaining slats mount to the insides of the corner posts. Cut the side slats to fit and install them with 1 5/8" deck screws. For the closed shed, cover the rear side with slats using the same techniques.
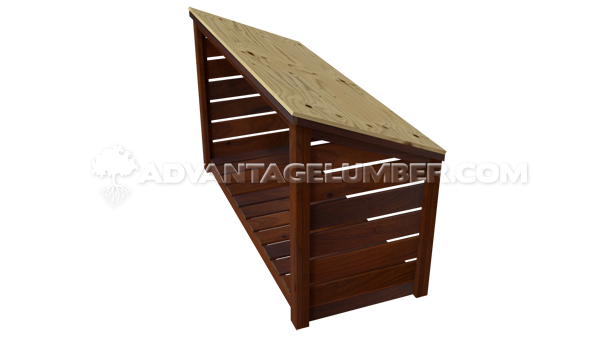
Sheath the roof with a piece of ¾" exterior plywood cut to 35 ½ to 81 ½". Overhang the posts by ¾" on all sides and fasten the sheathing to the posts, headers, and rafters with 2" deck screws. Add 1x2 Ipe trim along the edges of the sheathing, mitering the ends at the corners. Fasten the trim with 6d galvanized finish nails so the top edges are flush with the sheathing.

Apply the building paper over the sheathing and trim, overhanging the bottom roof edge by 1" and the sides by ½". Install the cedar shingles. Construct the roof cap with 1x3 and 1x4 Ipe trim boards. Join the boards to form an “L” using 6d finish nails. Fasten the cap along the tope edge of the roof with 6d nails.
The next four steps are for the CLOSED SHED ONLY:

Cut the 2x2 door ledger at 73". Install the ledger flush with the top of the floor frame, screwing through the back of the side support with 2 ½" screws. Cut the 2x4 doorposts to fit between the ledger and door header, as shown in the FLOOR PLAN. Note: The left post is on edge, and the right post is flat. Make sure the posts are level and fasten them with 2 ½ screws.

Install 1x3 shelf cleats at the desired height, fastening them to the rear and side slats and the right doorpost. Cut the ¾" plywood shelf to fir the space and install it with 1 5/8" deck screws.
For the door trim, cut four stiles at 41 ¾" and four rails at 18 ¼" from three 8-ft. 1x4s. Cut two stiles at 41 ¾" and two rails at 14 ¼" from one 10-ft. 1x4. Cut eight 1x6 Ipe boards at 40".

Assemble the rails and stiles, then attach the 1x6 boards with 1 ¼" deck screws. Screw through the backsides of the boards. Install the doors with two hinges each. Use offset sash hinges mounted to the shed posts, or use standard strap hinges mounted to ¾"- thick blocks.

By choosing Ipe, you will never have to worry about bug and mold damage to your shed. You can rest easy knowing that you have built a sturdy structure that will weather well in any atmosphere. If you liked how simple and easy this project was, check out our other great DIY tutorials.