Phone Hours
Monday–Friday 8:30am–8pm EST
Saturday 8am–3pm EST
Sunday Closed
| Choose Your Decking Specie: | |||||
| Ipe | Cumaru | Tigerwood | Brazilian Redwood | Garapa | |
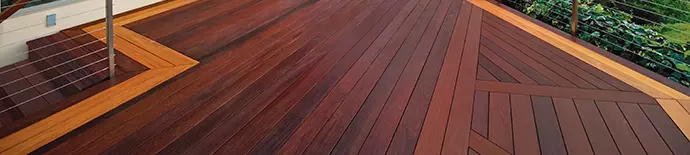
Ipe is a very dense, very hard wood. Use of some specialized or higher grade tools may be necessary for good results. This page will give you an overview of handling and building directives that will help you achieve the best results when building your Ipe deck.
Always check with local building codes and an architect prior to constructing. Follow all building codes that apply in your area. Since there are many different variables one can encounter on an installation project, it is your responsibility to test the material for suitability for your project prior to constructing. Follow all manufacturers' installation instructions for the individual products used on the project. If any building codes or manufacturers installation instructions contradict or differ from information provided by AdvantageLumber.com, contact us for written clarification prior to starting your project.
Our Ipe decking is air dried for outdoor use. Air dried Ipe lumber is suitable for many outdoor applications such as decks, siding, benches, docks, playgrounds, flower boxes, or other outdoor furniture.
Our standard and pre-grooved decking are both great choices for many outdoor deck and dock applications.
Tongue & Groove Porch Decking is for use under covered porches & covered patios only. Installing tongue and groove on a deck without a roof covering the deck surface will cause problems such as allowing excessive water to collect and cause the material to cup, swell, and buckle.

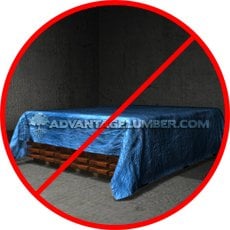
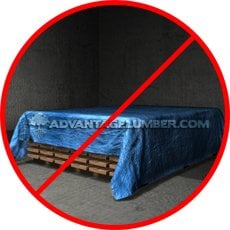
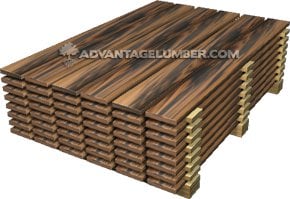
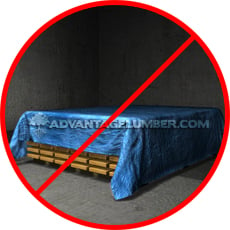
Ipe decking should be allowed to sit where it will be installed for 7 days prior to installation in order to get acclimated to your local temperature and humidity levels. DO NOT store the decking directly on the ground, or directly on top of a concrete surface. DO NOT store the material for more than 30 days prior to use without first consulting with a sales rep at advantagelumber.com that your storage conditions are optimal. The decking should be elevated at least 12" off the ground during acclimation. To ensure the bottom boards are well ventilated, place the decking on top of blocks of wood. DO NOT cover decking material with plastic or a tarp during this acclimation period. Covering with a tarp/plastic will trap moisture in and cause stability issues. Covering the top of the pile with a sheet of plywood to shed the water is recommended. Keep material dry until installation. Also keep stickers (or wood shims) between layers of boards to allow proper air flow (see image below). DO NOT store the material in a garage or any other enclosed area.
| Decking Dimension | Maximum Joist Spacing |
| 1x4 | 16" |
| 1x6 | 16" |
| 5/4x6 | 24" |
| 2x6 | 32" |
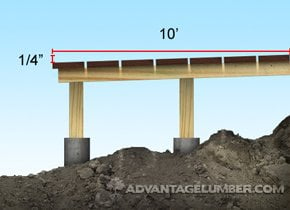
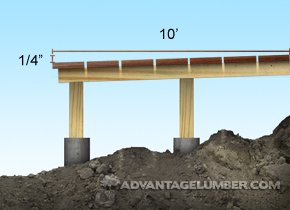
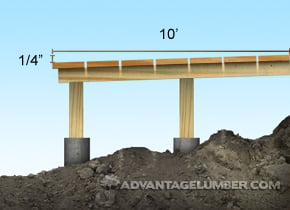
Ensure the deck substructure is pitched away from the house to allow for adequate water runoff. We recommend a minimum pitch of a 1/4" per 10 ft. for proper drainage on Standard and Pre-Grooved decking. For Tongue and Groove decking, a more aggressive pitch is recommended. We highly recommend using a 1/4" per foot slope. Framing material should be installed with the crown up (humps up) to aid in water draining off the surface material. Framing lumber can crown 1/8" or more, and may lead to standing water. Any standing puddle of water can cause surface decking to cup.
When installing Ipe decking, be sure to leave a gap between deck boards of 3/32". The difference in gap spacing is to ensure that the decking has room to expand and contract depending on the material used and the environment where it is installed. This also allows for proper air circulation. Average shrinkage is approximately 1/8" on 4" wide boards and 1/4" on 6" wide boards. Shrinkage may vary depending on climate, installation site, and method of use.

The deck design should allow for adequate cross ventilation underneath the deck to ensure stability, prevent cupping, prevent surface checking, and minimize the natural movement of the wood. We recommend a minimum of 18" of open air under joists along with open sides for proper cross ventilation. If you install skirting around the perimeter of the deck it is imperative that the skirting does not prevent cross ventilation. Do not allow standing water to collect under the deck. Ensure that the ground is adequately sloped under the deck to eliminate standing water under the structure.
Due to the very hard nature of Ipe, premium carbide tipped saw blades are recommended for cutting. Brad point drill bits or fostner bits provide cleaner holes than standard HSS twist bits.
Our Ipe decking is shipped with the end grain sealed with a clear wax to prevent any end checking. Fresh cuts should be sealed within 24hrs with end grain sealant. We sell end grain sealant by the quart, which is typically enough for 500 sq.ft. of decking. The end grain sealant is simply applied with a paintbrush and dries clear. DO NOT apply end seal to the surface of the decking. Any sealant that gets on the surface should be wiped off immediately.
Use only stainless steel fasteners to fasten hardwood decking or dimensional hardwood. Use of fasteners or screws made of anything other than 305 or higher grade stainless steel will cause unsightly staining and discoloration to the wood around the fastener and the fastener could corrode and fail prematurely. When fastening deck boards pre-drilling is required. Pre-drill all your holes with the appropriate sized drill bit for your screw size. Failing to predrill can cause the wood to split which can cause irreversible damage to the deck boards and make the boards come loose over time.
The use of Ipe Clip® hidden deck fasteners to fasten the deck boards is highly recommended. Ipe Clip hidden deck fasteners keep the deck surface blemish free. This deck fastening system also allows the wood to expand and contract on its width without putting undue shear pressure on the screws when wood expands/contracts. Using Ipe Clip® hidden deck fasteners instead of face screwing can help keep water from penetrating the surface of the wood. Ipe Clip® deck fasteners also helps keep the deck surface splinter free. If you choose to install decking using Ipe Clip® hidden deck fasteners, please refer to and follow the installation included in the system's packaging.
Because of Ipe's natural density and alkaline characteristics, many oil and water based finishes will not dry properly when applied. We recommend that you test any product on several sample boards to determine compatibility. The finish we sell and recommend is Ipe Oil™. We do not recommend the use of other finishes. Applying a finish approximately every two years (depending upon your local climate) can help keep the beautiful dark brown color. If you decide to let your deck weather, it will turn a silvery gray similar to teak. We recommend that you apply a coat of finish initially after deck installation, regardless of the final color desired. This can help ensure that the Ipe retains its oils and stability. For low ventilation applications, we recommend finishing deck boards on all four sides prior to installation but after acclimation.
If the need arises to glue your Ipe, waterproof glues, such as Gorilla brand polyurethane can be used with satisfactory results for gluing plugs into deck boards. Epoxy glues are also very suitable and can be dyed to black, brown or other colors to match your Ipe deck. Epoxy produces a very strong waterproof bond, particularly important for gluing posts.
If you have any questions, contact us for written clarification prior to starting your project.
By purchasing material from AdvantageLumber.com, you agree to comply with our Terms & Conditions.

| Choose Your Decking Specie: | |||||
| Ipe | Cumaru | Tigerwood | Brazilian Redwood | Garapa | |
Cumaru is a very dense, very hard wood. Use of some specialized or higher grade tools may be necessary for good results. This page will give you an overview of handling and building directives that will help you achieve the best results when building your Cumaru deck.
Always check with local building codes and an architect prior to constructing. Follow all building codes that apply in your area. Since there are many different variables one can encounter on an installation project, it is your responsibility to test the material for suitability for your project prior to constructing. Follow all manufacturers' installation instructions for the individual products used on the project. If any building codes or manufacturers installation instructions contradict or differ from information provided by AdvantageLumber.com, contact us for written clarification prior to starting your project.
Our Cumaru decking is kiln dried to a moisture content of approximately 14-16% for outdoor use. Kiln dried Cumaru lumber is suitable for many outdoor applications such as decks, siding, benches, docks, playgrounds, flower boxes, and other outdoor furniture.
Our standard and pre-grooved decking are both great choices for many outdoor deck and dock applications.
Tongue & Groove Porch Decking is for use under covered porches & covered patios only. Installing tongue and groove on a deck without a roof covering the deck surface will cause problems such as allowing excessive water to collect and cause the material to cup, swell, and buckle.
Cumaru decking should be allowed to sit where it will be installed for 7 days prior to installation in order to get acclimated to your local temperature and humidity levels. DO NOT store the decking directly on the ground, or directly on top of a concrete surface. DO NOT store the material for more than 30 days prior to use without first consulting with a sales rep at advantagelumber.com that your storage conditions are optimal. The decking should be elevated at least 12" off the ground during acclimation. To ensure the bottom boards are well ventilated, place the decking on top of blocks of wood. DO NOT cover decking material with plastic or a tarp during this acclimation period. Covering with a tarp/plastic will trap moisture in and cause stability issues. Covering the top of the pile with a sheet of plywood to shed the water is recommended. Keep material dry until installation. Also keep stickers (or wood shims) between layers of boards to allow proper air flow. DO NOT store the material in a garage or any other enclosed area.

| Decking Dimension | Maximum Joist Spacing |
| 1x4 | 16" |
| 1x6 | 16" |
| 5/4x6 | 24" |
| 2x6 | 32" |
Ensure the deck substructure is pitched away from the house to allow for adequate water runoff. We recommend a minimum pitch of a 1/4" per 10 ft. for proper drainage on Standard and Pre-Grooved decking. For Tongue and Groove decking, a more aggressive pitch is recommended. We highly recommend using a 1/4" per foot slope. Framing material should be installed with the crown up (humps up) to aid in water draining off the surface material. Framing lumber can crown 1/8" or more, and may lead to standing water. Any standing puddle of water can cause surface decking to cup.
When installing Cumaru decking, be sure to leave a 4mm gap between deck boards. This gap spacing may be adequately achieved by selecting the appropriate Ipe Clip® brand edge mount fastener which completes both functions of fastening and spacing the deck boards at the same time. The difference in gap spacing is to ensure that the decking has room to expand and contract depending on the material used and the environment where it is installed. This also allows for proper air circulation. Average shrinkage is approximately 1/8" on 4" wide boards and 1/4" on 6" wide boards. Shrinkage may vary depending on climate, installation site, and method of use.

The deck design should allow for adequate cross ventilation underneath the deck to ensure stability, prevent cupping, prevent surface checking, and minimize the natural movement of the wood. We recommend a minimum of 18" of open air under joists along with open sides for proper cross ventilation. If you install skirting around the perimeter of the deck it is imperative that the skirting does not prevent cross ventilation. Do not allow standing water to collect under the deck. Ensure that the ground is adequately sloped under the deck to eliminate standing water under the structure.
Due to the very hard nature of Cumaru, premium carbide tipped saw blades are recommended for cutting. Brad point drill bits or fostner bits provide cleaner holes than standard HSS twist bits.
Our Cumaru decking is shipped with the end grain sealed with a clear wax to prevent any end checking. Fresh cuts should be sealed within 24hrs with end grain sealant. We sell end grain sealant by the quart, which is typically enough for 500 sq.ft. of decking. The end grain sealant is simply applied with a paintbrush and dries clear. DO NOT apply end seal to the surface of the decking. Any sealant that gets on the surface should be wiped off immediately.
Use only stainless steel fasteners to fasten hardwood decking or dimensional hardwood. Use of fasteners or screws made of anything other than 305 or higher grade stainless steel will cause unsightly staining and discoloration to the wood around the fastener and the fastener could corrode and fail prematurely. When fastening deck boards pre-drilling is required. Pre-drill all your holes with the appropriate sized drill bit for your screw size. Failing to predrill can cause the wood to split which can cause irreversible damage to the deck boards and make the boards come loose over time.
The use of Ipe Clip® hidden deck fasteners to fasten the deck boards is highly recommended. Ipe Clip hidden deck fasteners keep the deck surface blemish free. This deck fastening system also allows the wood to expand and contract on its width without putting undue shear pressure on the screws when wood expands/contracts. Using Ipe Clip® hidden deck fasteners instead of face screwing can help keep water from penetrating the surface of the wood. Ipe Clip® deck fasteners also helps keep the deck surface splinter free. If you choose to install decking using Ipe Clip® hidden deck fasteners, please refer to and follow the installation included in the system's packaging.
Because of Cumaru's natural density and alkaline characteristics, many oil and water based finishes will not dry properly when applied. We recommend that you test any product on several sample boards to determine compatibility. The finish we sell and recommend is Ipe Oil™. We do not recommend the use of other finishes. Applying a finish approximately every two years (depending upon your local climate) can help keep the beautiful dark brown color. If you decide to let your deck weather, it will turn a silvery gray similar to teak. We recommend that you apply a coat of finish initially after deck installation, regardless of the final color desired. This can help ensure that the Cumaru retains its oils and stability.
For low ventilation applications, we recommend finishing deck boards on all four sides prior to installation but after acclimation.
If the need arises to glue your Cumaru, waterproof glues, such as Gorilla brand polyurethane can be used with satisfactory results for gluing plugs into deck boards. Epoxy glues are also very suitable and can be dyed to black, brown or other colors to match your Cumaru deck. Epoxy produces a very strong waterproof bond, particularly important for gluing posts.
If you have any questions, contact us for written clarification prior to starting your project.
By purchasing material from AdvantageLumber.com, you agree to comply with our Terms & Conditions.
| Choose Your Decking Specie: | |||||
| Ipe | Cumaru | Tigerwood | Brazilian Redwood | Garapa | |
Tigerwood is a very dense, very hard wood. Use of some specialized or higher grade tools may be necessary for good results. This page will give you an overview of handling and building directives that will help you achieve the best results when building your Tigerwood deck.
Always check with local building codes and an architect prior to constructing. Follow all building codes that apply in your area. Since there are many different variables one can encounter on an installation project, it is your responsibility to test the material for suitability for your project prior to constructing. Follow all manufacturers' installation instructions for the individual products used on the project. If any building codes or manufacturers installation instructions contradict or differ from information provided by AdvantageLumber.com, contact us for written clarification prior to starting your project.
Our Tigerwood decking is kiln dried to a moisture content of approximately 14-16% for outdoor use. Kiln dried Tigerwood lumber is suitable for many outdoor applications such as decks, siding, benches, docks, playgrounds, flower boxes, and other outdoor furniture.
Our standard and pre-grooved decking are both great choices for many outdoor deck and dock applications.
Tongue & Groove Porch Decking is for use under covered porches & covered patios only. Installing tongue and groove on a deck without a roof covering the deck surface will cause problems such as allowing excessive water to collect and cause the material to cup, swell, and buckle.
Tigerwood decking should be allowed to sit where it will be installed for 7 days prior to installation in order to get acclimated to your local temperature and humidity levels. DO NOT store the decking directly on the ground, or directly on top of a concrete surface. DO NOT store the material for more than 30 days prior to use without first consulting with a sales rep at advantagelumber.com that your storage conditions are optimal. The decking should be elevated at least 12" off the ground during acclimation. To ensure the bottom boards are well ventilated, place the decking on top of blocks of wood. DO NOT cover decking material with plastic or a tarp during this acclimation period. Covering with a tarp/plastic will trap moisture in and cause stability issues. Covering the top of the pile with a sheet of plywood to shed the water is recommended. Keep material dry until installation. Also keep stickers (or wood shims) between layers of boards to allow proper air flow. DO NOT store the material in a garage or any other enclosed area.
| Decking Dimension | Maximum Joist Spacing |
| 1x4 | 16" |
| 1x6 | 16" |
| 5/4x6 | 24" |
| 2x6 | 32" |

Ensure the deck substructure is pitched away from the house to allow for adequate water runoff. We recommend a minimum pitch of a 1/4" per 10 ft. for proper drainage on Standard and Pre-Grooved decking. For Tongue and Groove decking, a more aggressive pitch is recommended. We highly recommend using a 1/4" per foot slope. Framing material should be installed with the crown up (humps up) to aid in water draining off the surface material. Framing lumber can crown 1/8" or more, and may lead to standing water. Any standing puddle of water can cause surface decking to cup.
When installing Tigerwood decking, be sure to leave a 4mm gap between deck boards. This gap spacing may be adequately achieved by selecting the appropriate Ipe Clip® brand edge mount fastener which completes both functions of fastening and spacing the deck boards at the same time. The difference in gap spacing is to ensure that the decking has room to expand and contract depending on the material used and the environment where it is installed. This also allows for proper air circulation. Average shrinkage is approximately 1/8" on 4" wide boards and 1/4" on 6" wide boards. Shrinkage may vary depending on climate, installation site, and method of use.

The deck design should allow for adequate cross ventilation underneath the deck to ensure stability, prevent cupping, prevent surface checking, and minimize the natural movement of the wood. We recommend a minimum of 18" of open air under joists along with open sides for proper cross ventilation. If you install skirting around the perimeter of the deck it is imperative that the skirting does not prevent cross ventilation. Do not allow standing water to collect under the deck. Ensure that the ground is adequately sloped under the deck to eliminate standing water under the structure.
Due to the very hard nature of Tigerwood, premium carbide tipped saw blades are recommended for cutting. Brad point drill bits or fostner bits provide cleaner holes than standard HSS twist bits.
Our Tigerwood decking is shipped with the end grain sealed with a clear wax to prevent any end checking. Fresh cuts should be sealed within 24hrs with end grain sealant. We sell end grain sealant by the quart, which is typically enough for 500 sq.ft. of decking. The end grain sealant is simply applied with a paintbrush and dries clear. DO NOT apply end seal to the surface of the decking. Any sealant that gets on the surface should be wiped off immediately.
Use only stainless steel fasteners to fasten hardwood decking or dimensional hardwood. Use of fasteners or screws made of anything other than 305 or higher grade stainless steel will cause unsightly staining and discoloration to the wood around the fastener and the fastener could corrode and fail prematurely. When fastening deck boards pre-drilling is required. Pre-drill all your holes with the appropriate sized drill bit for your screw size. Failing to predrill can cause the wood to split which can cause irreversible damage to the deck boards and make the boards come loose over time.
The use of Ipe Clip® hidden deck fasteners to fasten the deck boards is highly recommended. Ipe Clip hidden deck fasteners keep the deck surface blemish free. This deck fastening system also allows the wood to expand and contract on its width without putting undue shear pressure on the screws when wood expands/contracts. Using Ipe Clip® hidden deck fasteners instead of face screwing can help keep water from penetrating the surface of the wood. Ipe Clip® deck fasteners also helps keep the deck surface splinter free. If you choose to install decking using Ipe Clip® hidden deck fasteners, please refer to and follow the installation included in the system's packaging.
Because of Tigerwood's natural density and alkaline characteristics, many oil and water based finishes will not dry properly when applied. We recommend that you test any product on several sample boards to determine compatibility. The finish we sell and recommend is Ipe Oil™. We do not recommend the use of other finishes. Applying a finish approximately every two years (depending upon your local climate) can help keep the beautiful dark brown color. If you decide to let your deck weather, it will turn a silvery gray similar to teak. We recommend that you apply a coat of finish initially after deck installation, regardless of the final color desired. This can help ensure that the Tigerwood retains its oils and stability.
For low ventilation applications, we recommend finishing deck boards on all four sides prior to installation but after acclimation.
If the need arises to glue your Tigerwood, waterproof glues, such as Gorilla brand polyurethane can be used with satisfactory results for gluing plugs into deck boards. Epoxy glues are also very suitable and can be dyed to black, brown or other colors to match your Tigerwood deck. Epoxy produces a very strong waterproof bond, particularly important for gluing posts.
If you have any questions, contact us for written clarification prior to starting your project.
By purchasing material from AdvantageLumber.com, you agree to comply with our Terms & Conditions.
| Choose Your Decking Specie: | |||||
| Ipe | Cumaru | Tigerwood | Brazilian Redwood | Garapa | |
Tigerwood is a very dense, very hard wood. Use of some specialized or higher grade tools may be necessary for good results. This page will give you an overview of handling and building directives that will help you achieve the best results when building your Brazilian Redwood deck.
Always check with local building codes and an architect prior to constructing. Follow all building codes that apply in your area. Since there are many different variables one can encounter on an installation project, it is your responsibility to test the material for suitability for your project prior to constructing. Follow all manufacturers' installation instructions for the individual products used on the project. If any building codes or manufacturers installation instructions contradict or differ from information provided by AdvantageLumber.com, contact us for written clarification prior to starting your project.
Our Brazilian Redwood decking is kiln dried to a moisture content of approximately 14-16% for outdoor use. Kiln dried Brazilian Redwood lumber is suitable for many outdoor applications such as decks, siding, benches, docks, playgrounds, flower boxes, and other outdoor furniture.
Our standard and pre-grooved decking are both great choices for many outdoor deck and dock applications.
Tongue & Groove Porch Decking is for use under covered porches & covered patios only. Installing tongue and groove on a deck without a roof covering the deck surface will cause problems such as allowing excessive water to collect and cause the material to cup, swell, and buckle.

Brazilian Redwood decking should be allowed to sit where it will be installed for 7 days prior to installation in order to get acclimated to your local temperature and humidity levels. DO NOT store the decking directly on the ground, or directly on top of a concrete surface. DO NOT store the material for more than 30 days prior to use without first consulting with a sales rep at advantagelumber.com that your storage conditions are optimal. The decking should be elevated at least 12" off the ground during acclimation. To ensure the bottom boards are well ventilated, place the decking on top of blocks of wood. DO NOT cover decking material with plastic or a tarp during this acclimation period. Covering with a tarp/plastic will trap moisture in and cause stability issues. Covering the top of the pile with a sheet of plywood to shed the water is recommended. Keep material dry until installation. Also keep stickers (or wood shims) between layers of boards to allow proper air flow. DO NOT store the material in a garage or any other enclosed area.
| Decking Dimension | Maximum Joist Spacing |
| 1x4 | 16" |
| 1x6 | 16" |
| 5/4x6 | 24" |
| 2x6 | 32" |

Ensure the deck substructure is pitched away from the house to allow for adequate water runoff. We recommend a minimum pitch of a 1/4" per 10 ft. for proper drainage on Standard and Pre-Grooved decking. For Tongue and Groove decking, a more aggressive pitch is recommended. We highly recommend using a 1/4" per foot slope. Framing material should be installed with the crown up (humps up) to aid in water draining off the surface material. Framing lumber can crown 1/8" or more, and may lead to standing water. Any standing puddle of water can cause surface decking to cup.
When installing Brazilian Redwood decking, be sure to leave a 4mm gap between deck boards. This gap spacing may be adequately achieved by selecting the appropriate Ipe Clip® brand edge mount fastener which completes both functions of fastening and spacing the deck boards at the same time. The difference in gap spacing is to ensure that the decking has room to expand and contract depending on the material used and the environment where it is installed. This also allows for proper air circulation. Average shrinkage is approximately 1/8" on 4" wide boards and 1/4" on 6" wide boards. Shrinkage may vary depending on climate, installation site, and method of use.

The deck design should allow for adequate cross ventilation underneath the deck to ensure stability, prevent cupping, prevent surface checking, and minimize the natural movement of the wood. We recommend a minimum of 18" of open air under joists along with open sides for proper cross ventilation. If you install skirting around the perimeter of the deck it is imperative that the skirting does not prevent cross ventilation. Do not allow standing water to collect under the deck. Ensure that the ground is adequately sloped under the deck to eliminate standing water under the structure.
Due to the very hard nature of Brazilian Redwood, premium carbide tipped saw blades are recommended for cutting. Brad point drill bits or fostner bits provide cleaner holes than standard HSS twist bits.
Our Brazilian Redwood decking is shipped with the end grain sealed with a clear wax to prevent any end checking. Fresh cuts should be sealed within 24hrs with end grain sealant. We sell end grain sealant by the quart, which is typically enough for 500 sq.ft. of decking. The end grain sealant is simply applied with a paintbrush and dries clear. DO NOT apply end seal to the surface of the decking. Any sealant that gets on the surface should be wiped off immediately.
Use only stainless steel fasteners to fasten hardwood decking or dimensional hardwood. Use of fasteners or screws made of anything other than 305 or higher grade stainless steel will cause unsightly staining and discoloration to the wood around the fastener and the fastener could corrode and fail prematurely. When fastening deck boards pre-drilling is required. Pre-drill all your holes with the appropriate sized drill bit for your screw size. Failing to predrill can cause the wood to split which can cause irreversible damage to the deck boards and make the boards come loose over time.
The use of Ipe Clip® hidden deck fasteners to fasten the deck boards is highly recommended. Ipe Clip hidden deck fasteners keep the deck surface blemish free. This deck fastening system also allows the wood to expand and contract on its width without putting undue shear pressure on the screws when wood expands/contracts. Using Ipe Clip® hidden deck fasteners instead of face screwing can help keep water from penetrating the surface of the wood. Ipe Clip® deck fasteners also helps keep the deck surface splinter free. If you choose to install decking using Ipe Clip® hidden deck fasteners, please refer to and follow the installation included in the system's packaging.
Because of Brazilian Redwood's natural density and alkaline characteristics, many oil and water based finishes will not dry properly when applied. We recommend that you test any product on several sample boards to determine compatibility. The finish we sell and recommend is Ipe Oil™. We do not recommend the use of other finishes. Applying a finish approximately every two years (depending upon your local climate) can help keep the beautiful dark brown color. If you decide to let your deck weather, it will turn a silvery gray similar to teak. We recommend that you apply a coat of finish initially after deck installation, regardless of the final color desired. This can help ensure that the Brazilian Redwood retains its oils and stability.
For low ventilation applications, we recommend finishing deck boards on all four sides prior to installation but after acclimation.
If the need arises to glue your Brazilian Redwood, waterproof glues, such as Gorilla brand polyurethane can be used with satisfactory results for gluing plugs into deck boards. Epoxy glues are also very suitable and can be dyed to black, brown or other colors to match your Brazilian Redwood deck. Epoxy produces a very strong waterproof bond, particularly important for gluing posts.
If you have any questions, contact us for written clarification prior to starting your project.
By purchasing material from AdvantageLumber.com, you agree to comply with our Terms & Conditions.
| Choose Your Decking Specie: | |||||
| Ipe | Cumaru | Tigerwood | Brazilian Redwood | Garapa | |
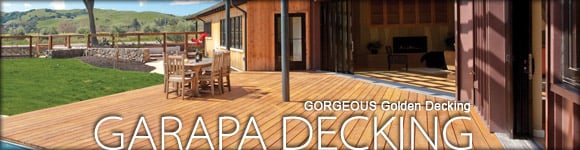
Garapa is a very dense, very hard wood. Use of some specialized or higher grade tools may be necessary for good results. This page will give you an overview of handling and building directives that will help you achieve the best results when building your Garapa deck.
Always check with local building codes and an architect prior to constructing. Follow all building codes that apply in your area. Since there are many different variables one can encounter on an installation project, it is your responsibility to test the material for suitability for your project prior to constructing. Follow all manufacturers' installation instructions for the individual products used on the project. If any building codes or manufacturers installation instructions contradict or differ from information provided by AdvantageLumber.com, contact us for written clarification prior to starting your project.
Our Garapa decking is kiln dried to a moisture content of approximately 14-16% for outdoor use. Kiln dried Garapa lumber is suitable for many outdoor applications such as decks, siding, benches, docks, playgrounds, flower boxes, and other outdoor furniture.
Our standard and pre-grooved decking are both great choices for many outdoor deck and dock applications.
Tongue & Groove Porch Decking is for use under covered porches & covered patios only. Installing tongue and groove on a deck without a roof covering the deck surface will cause problems such as allowing excessive water to collect and cause the material to cup, swell, and buckle.
Garapa decking should be allowed to sit where it will be installed for 7 days prior to installation in order to get acclimated to your local temperature and humidity levels. DO NOT store the decking directly on the ground, or directly on top of a concrete surface. DO NOT store the material for more than 30 days prior to use without first consulting with a sales rep at advantagelumber.com that your storage conditions are optimal. The decking should be elevated at least 12" off the ground during acclimation. To ensure the bottom boards are well ventilated, place the decking on top of blocks of wood. DO NOT cover decking material with plastic or a tarp during this acclimation period. Covering with a tarp/plastic will trap moisture in and cause stability issues. Covering the top of the pile with a sheet of plywood to shed the water is recommended. Keep material dry until installation. Also keep stickers (or wood shims) between layers of boards to allow proper air flow. DO NOT store the material in a garage or any other enclosed area.
| Decking Dimension | Maximum Joist Spacing |
| 1x4 | 16" |
| 1x6 | 16" |
| 5/4x6 | 24" |
| 2x6 | 32" |
Ensure the deck substructure is pitched away from the house to allow for adequate water runoff. We recommend a minimum pitch of a 1/4" per 10 ft. for proper drainage on Standard and Pre-Grooved decking. For Tongue and Groove decking, a more aggressive pitch is recommended. We highly recommend using a 1/4" per foot slope. Framing material should be installed with the crown up (humps up) to aid in water draining off the surface material. Framing lumber can crown 1/8" or more, and may lead to standing water. Any standing puddle of water can cause surface decking to cup.
When installing Garapa decking, be sure to leave a 4mm gap between deck boards. This gap spacing may be adequately achieved by selecting the appropriate Ipe Clip® brand edge mount fastener which completes both functions of fastening and spacing the deck boards at the same time. The difference in gap spacing is to ensure that the decking has room to expand and contract depending on the material used and the environment where it is installed. This also allows for proper air circulation. Average shrinkage is approximately 1/8" on 4" wide boards and 1/4" on 6" wide boards. Shrinkage may vary depending on climate, installation site, and method of use.

The deck design should allow for adequate cross ventilation underneath the deck to ensure stability, prevent cupping, prevent surface checking, and minimize the natural movement of the wood. We recommend a minimum of 18" of open air under joists along with open sides for proper cross ventilation. If you install skirting around the perimeter of the deck it is imperative that the skirting does not prevent cross ventilation. Do not allow standing water to collect under the deck. Ensure that the ground is adequately sloped under the deck to eliminate standing water under the structure.
Due to the very hard nature of Garapa, premium carbide tipped saw blades are recommended for cutting. Brad point drill bits or fostner bits provide cleaner holes than standard HSS twist bits.
Our Garapa decking is shipped with the end grain sealed with a clear wax to prevent any end checking. Fresh cuts should be sealed within 24hrs with end grain sealant. We sell end grain sealant by the quart, which is typically enough for 500 sq.ft. of decking. The end grain sealant is simply applied with a paintbrush and dries clear. DO NOT apply end seal to the surface of the decking. Any sealant that gets on the surface should be wiped off immediately.
Use only stainless steel fasteners to fasten hardwood decking or dimensional hardwood. Use of fasteners or screws made of anything other than 305 or higher grade stainless steel will cause unsightly staining and discoloration to the wood around the fastener and the fastener could corrode and fail prematurely. When fastening deck boards pre-drilling is required. Pre-drill all your holes with the appropriate sized drill bit for your screw size. Failing to predrill can cause the wood to split which can cause irreversible damage to the deck boards and make the boards come loose over time.
The use of Ipe Clip® hidden deck fasteners to fasten the deck boards is highly recommended. Ipe Clip hidden deck fasteners keep the deck surface blemish free. This deck fastening system also allows the wood to expand and contract on its width without putting undue shear pressure on the screws when wood expands/contracts. Using Ipe Clip® hidden deck fasteners instead of face screwing can help keep water from penetrating the surface of the wood. Ipe Clip® deck fasteners also helps keep the deck surface splinter free. If you choose to install decking using Ipe Clip® hidden deck fasteners, please refer to and follow the installation included in the system's packaging.
Because of Garapa's natural density and alkaline characteristics, many oil and water based finishes will not dry properly when applied. We recommend that you test any product on several sample boards to determine compatibility. The finish we sell and recommend is Ipe Oil™. We do not recommend the use of other finishes. Applying a finish approximately every two years (depending upon your local climate) can help keep the beautiful dark brown color. If you decide to let your deck weather, it will turn a silvery gray similar to teak. We recommend that you apply a coat of finish initially after deck installation, regardless of the final color desired. This can help ensure that the Garapa retains its oils and stability.
For low ventilation applications, we recommend finishing deck boards on all four sides prior to installation but after acclimation.
If the need arises to glue your Garapa, waterproof glues, such as Gorilla brand polyurethane can be used with satisfactory results for gluing plugs into deck boards. Epoxy glues are also very suitable and can be dyed to black, brown or other colors to match your Garapa deck. Epoxy produces a very strong waterproof bond, particularly important for gluing posts.
If you have any questions, contact us for written clarification prior to starting your project.
By purchasing material from AdvantageLumber.com, you agree to comply with our Terms & Conditions.
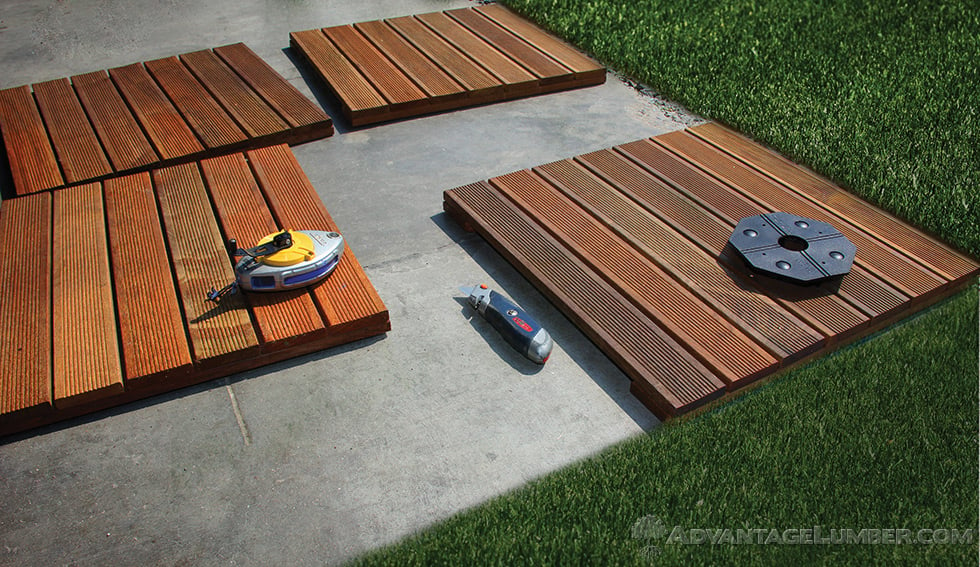
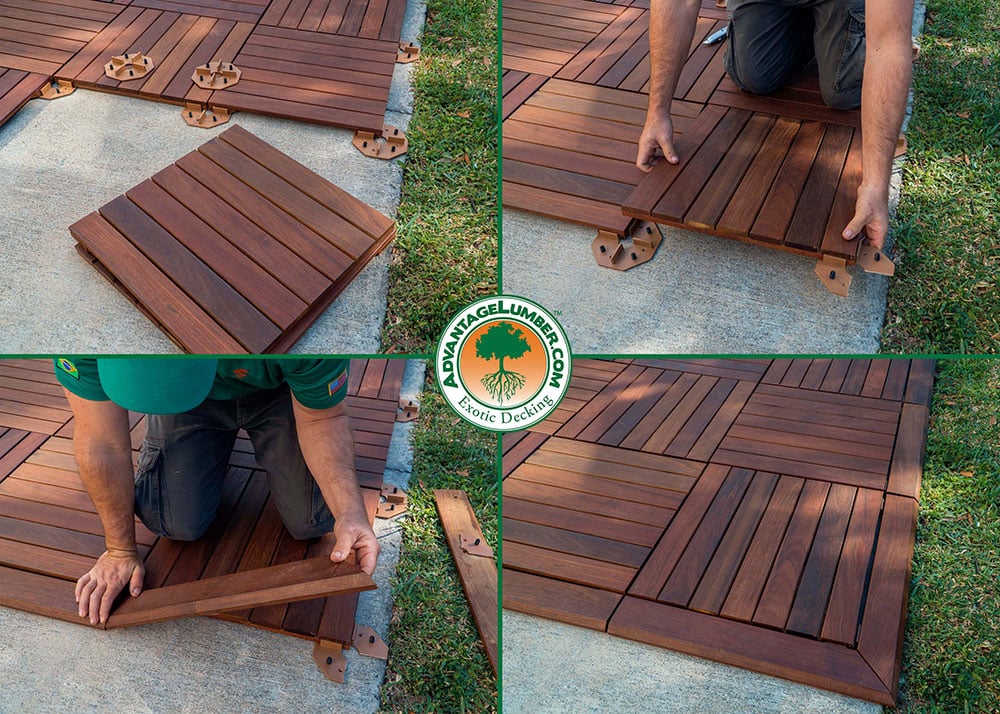
Prep the Surface
Make sure the surface being covered is relatively flat and free of anything that may get in the way of installation such as sticks, rocks or furniture. Then choose one corner of the area to begin working in. Optionally, you may snap a chalk line to have a straight line to follow during installation.
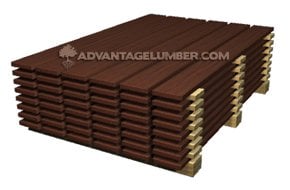
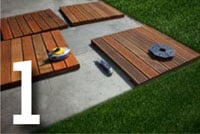
Set First Tile
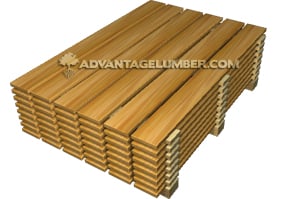
Advantage wood-backed deck tiles are milled with four predrilled holes located in each corner. DeckWise® Tile Connector fits each of these holes with four specially designed ribbed pins (aka Pine tree fasteners). For a secure fit, simply set one of the tiles onto the preinstalled fasteners.
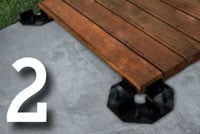
Set Additional Tiles
Once the first tile is laid, you can proceed placing the other tiles onto the remaining pins. The Deck Tile Connector automatically sets the gap spacing to 3/16" so you won't have to worry about an uneven look.
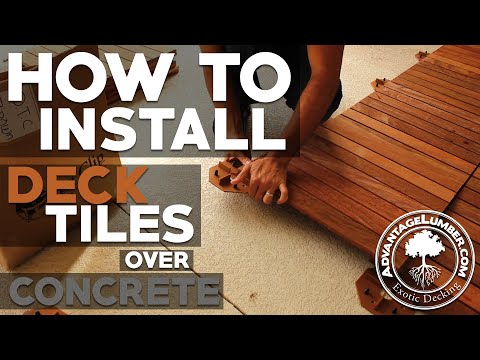
Imagine how good it would feel to replace the look of your bland, worn out concrete patio. Now imagine how good it would feel to transform the look of that patio in just one day!
Watch this informative video on how easy it is to install Ipe deck tiles over a concrete patio.

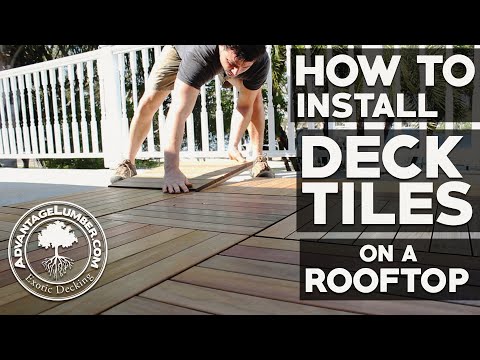
If you're looking for a quick and easy way to install deck tiles onto a balcony or terrace, watch the video below. In under two minutes, you will discover how fast and easy this system is to install. Just make sure the area is pitched for adequate runoff. We always recommend that you consult with a licensed contractor and local building department prior to starting any project.
*This is just one example of how to install deck tiles. You must always consult with your local building department to ensure your project coincides with approved building codes.

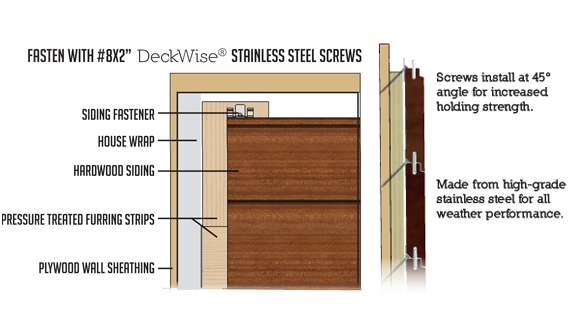

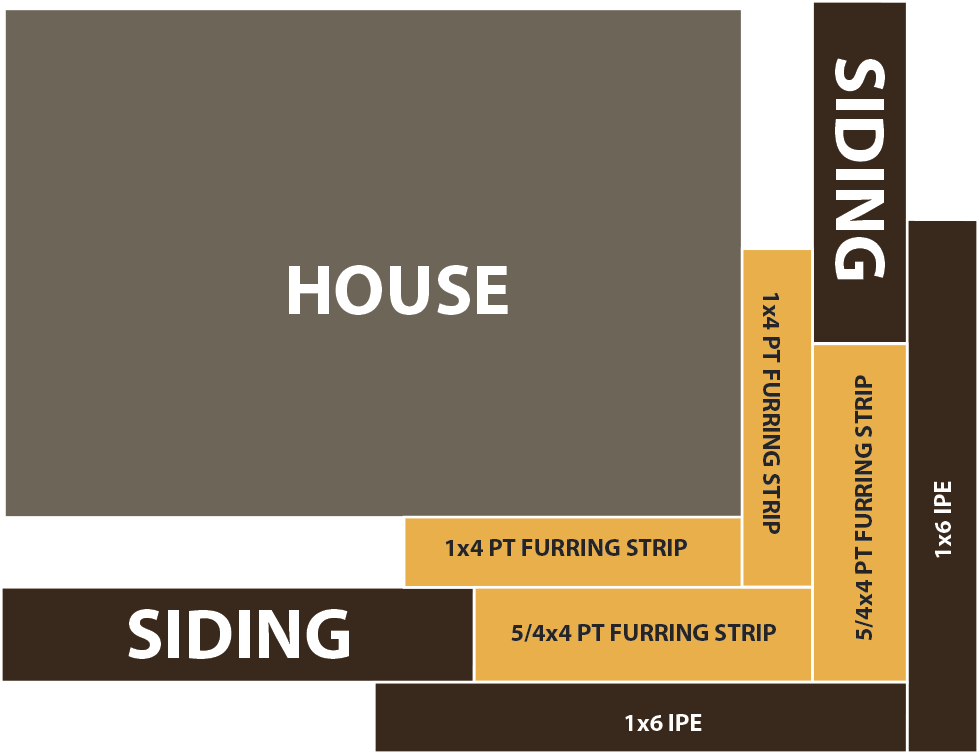
This Advantage Rainscreen Siding is for use with DeckWise™ Siding Fasteners >
When installing Rainscreen Siding, install each board as tightly as possible to leave the smallest gaps between them in case shrinkage occurs. Average shrinkage is 1/8” on 4” wide boards and ¼” on 6” wide boards. Shrinkage varies depending on climate, installation site, and method of use.
Due to the very hard nature of Rainscreen Siding, premium carbide tipped saw blades are recommended for cutting. Brad point drill bits or fostner bits provide cleaner holes than standard HSS twist bits.
Our Rainscreen Siding is shipped with the end grain sealed with a clear wax to prevent any end checking and adverse movement. Fresh cuts should be sealed within 24hrs with end grain sealant. We sell end grain sealant by the quart, which is typically enough for 500 sq.ft. of siding. The end grain sealant is simply applied with a paintbrush and dries clear. DO NOT apply end seal to the surface of the siding. Any sealant that gets on the surface should be wiped off immediately.
Because of Exotic Hardwood's natural density and alkaline characteristics, many oil and water based finishes will not dry properly when applied. We recommend that you test any product on several sample boards to determine compatibility. The finish we sell and recommend is Ipe Oil™. We do not recommend the use of other finishes. Applying a finish approximately every two years (depending upon your local climate) can help keep the beautiful dark brown color. If you decide to let your deck weather, it will turn a silvery gray similar to teak. We recommend that you apply a coat of finish initially after deck installation, regardless of the final color desired. This can help ensure that the Ipe retains its oils and stability. For low ventilation applications, we recommend finishing deck boards on all four sides prior to installation but after acclimation.
Advantage Lumber, LLC provides this information as possible suggestions only and will not be held liable for your project's suitability or should you choose not to obtain the required permits, or if you fail to comply with all zoning ordinances and building codes.
If you have any questions, contact us for written clarification prior to starting your project.
By purchasing material from AdvantageLumber.com, you agree to comply with our Terms & Conditions.

Always check with local building codes and an architect prior to constructing. Follow all building codes that apply in your area. Since there are many different variables one can encounter on an installation project, it is your responsibility to test the material for suitability for your project prior to constructing. Follow all manufacturers' installation instructions for the individual products used on the project. If any building codes or manufacturers installation instructions contradict or differ from information provided by AdvantageLumber.com, contact us for written clarification prior to starting your project.

Hardwood siding should be allowed to sit where it will be installed for 7 days prior to installation in order to get acclimated to your local temperature and humidity levels. DO NOT store the siding directly on the ground, or directly on top of a concrete surface. DO NOT store the material for more than 30 days prior to use without first consulting with a sales rep at advantagelumber.com that your storage conditions are optimal. The siding should be elevated at least 12" off the ground during acclimation. To ensure the bottom boards are well ventilated, place the decking on top of blocks of wood. DO NOT cover siding material with plastic or a tarp during this acclimation period. Covering with a tarp/plastic will trap moisture in and cause stability issues. Covering the top of the pile with a sheet of plywood to shed the water is recommended. Keep material dry until installation. Also keep stickers (or wood shims) between layers of boards to allow proper air flow (see image below). DO NOT store the material in a garage or any other enclosed area.

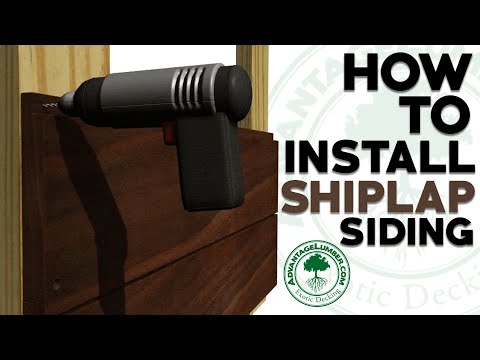
Every project is unique. To ensure your siding installation goes smoothly and is long-lasting, we've provided a set of general guidelines to help you. Remember, these are guidelines only. Please consult your local building codes, or a professional siding installer in your area. Consulting your local building department, or HOA prior to starting exterior renovations to either a residential, or commercial building should be a required step prior to installation. If you have any questions about this How-To Install Wood SIding guide, give us a call. We'd love to help.
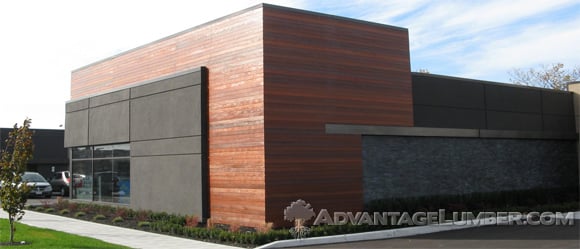
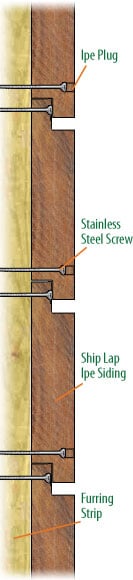 |
 Ipe Shiplap Siding Shown |
Please CONTACT US if you have a specific request.
When installing Shiplap Siding, install each board as tightly as possible to leave the smallest gaps between them in case shrinkage occurs. Average shrinkage is 1/8” on 4” wide boards and ¼” on 6” wide boards. Shrinkage varies depending on climate, installation site, and method of use.
Due to the very hard nature of Shiplap Siding, premium carbide tipped saw blades are recommended for cutting. Brad point drill bits or fostner bits provide cleaner holes than standard HSS twist bits.
Our Shiplap Siding is shipped with the end grain sealed with a clear wax to prevent any end checking and adverse movement. Fresh cuts should be sealed within 24hrs with end grain sealant. We sell end grain sealant by the quart, which is typically enough for 500 sq.ft. of siding. The end grain sealant is simply applied with a paintbrush and dries clear. DO NOT apply end seal to the surface of the siding. Any sealant that gets on the surface should be wiped off immediately.
Because of Exotic Hardwood's natural density and alkaline characteristics, many oil and water based finishes will not dry properly when applied. We recommend that you test any product on several sample boards to determine compatibility. The finish we sell and recommend is Ipe Oil™. We do not recommend the use of other finishes. Applying a finish approximately every two years (depending upon your local climate) can help keep the beautiful dark brown color. If you decide to let your deck weather, it will turn a silvery gray similar to teak. We recommend that you apply a coat of finish initially after deck installation, regardless of the final color desired. This can help ensure that the Ipe retains its oils and stability. For low ventilation applications, we recommend finishing deck boards on all four sides prior to installation but after acclimation.
Advantage Lumber, LLC provides this information as possible suggestions only and will not be held liable for your project's suitability or should you choose not to obtain the required permits, or if you fail to comply with all zoning ordinances and building codes.
If you have any questions, contact us for written clarification prior to starting your project.
By purchasing material from AdvantageLumber.com, you agree to comply with our Terms & Conditions.